|
|
Installation Procedure - Download guide: FlexTimer G2 Installation Guide - Locate a fused power source of proper size that is always on (Battery Hot). Maximum current draw is 30 amps. A wire sizing chart is available at http://wiredrite.com/download/wireguage.pdf. Do not attach power yet!
- Mount the FlexTimer at your desired location. The unit is designed to withstand the rigors of a mount in the engine compartment, but must not be submerged.
- Set the timer DIP switch settings to your desired value. See chart above for settings.
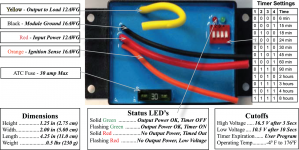
- If you are using the Ignition Sense method of triggering, attach the Orange wire to a power source that is ON when the ignition switch is in the ON position.
- Attach the module ground wire (BLACK) to an appropriate ground.
- Attach your load to the YELLOW wire. Attach the Battery Hot wire from step 1.
- Test your installation and modify the DIP switch timer settings if necessary. In order for the new setting to be recognized, the input power must be cycled once.
|